Pages

Sunday, March 31, 2013

Tofu Pancakes Like Mom Used to Make

Several meatless Mondays ago, I had a craving for tofu pancakes. I wanted something similar to what Mom used to make for Dad when I was a kid: crushed tofu with egg. It was not really my favorite as a kid, but now that I acquired a taste for tofu, I seem to be craving it - sort of like comfort food, but not really.

I consulted my favorite recipe book (Google, as you remember) and found some options. Unfortunately, the ones that I found did not use eggs. All the tofu pancakes that I found were vegan; therefore, eggs were not used. I also found recipes for Tofu Chocolate Cakes, which maybe a great project, but not right now.

Finally, I ran into a recipe for Tahu Telur, an Indonesian dish courtesy of NDTV Cooks. It seemed like it had the components of what Mom used to make, but a lot of extras. This seemed promising.

Preparation and Cooking

I pretty much stuck to the recipe, but I cut it in half since it will only be my husband and me, Well, sort of... I eyeballed the half-part. I started with the omelets first (or patties). The recipe called for three tofu squares and three eggs. Growing up in the Philippines, the squares were much smaller than the blocks that are sold in our grocery stores in California. I also started with one egg, but ended up using two.

prepping pancakes
Prepping
I wanted a bit more fiber on it. I looked in my vegetable crisper for options, and the carrots seemed to call to me. I went ahead and shredded about a quarter of a cup. I think using two eggs helped here. I also added a dash or two of garlic powder, since I was concerned that the cakes may turn out to be a bit bland.

tofu mixture
Tofu mixture in progress

I opted to make the tofu patties a bit smaller than saucer size. These are more small hamburger patty size. I've read that to fry these patties, it is best to get it brown on one side then flip it. Flipping it prematurely may cause it to fall apart.

frying pancakes
Patties on the fryer: Only fits three at a time

While the tofu patties were frying, I cooked the sauce. This time, I stuck to the recipe with no improvisations. The sauce was soy sauce based with onions, tomatoes, and sugar. I was planning to make a simpler sauce, but I thought it would be better to stick to the original recipe for now to see what works and what does not.
cooking sweet soy sauce
Sauce Cooking - Smells great with the garlic and onions

The Verdict

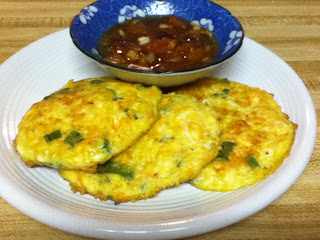
These took a bit longer to cook than I thought. I was hungry, so that may have been a factor.  After it was done, it was worth it. It did remind me of Mom's tofu pancakes. I was planning to have them with rice for (a now late) lunch, but I can imagine these being served as appetizers.

tofu pancakes entree
Entree portion: My lunch!

tofu pancake appetizer
My husband's portion: Appetizers only
Other options

Since I had left-over tofu and quinoa, I decided to make these again as a tofu/quinoa pancake. I did not have green onions left, but I kept the carrots.  I used these patties for a sandwich and used a honey mustard dressing instead. This combination was equally good: the quinoa provided a nuttiness to the patties, but I did miss the flavor of the onions. The onions provided some sweetness and freshness. Also, the honey mustard dressing was good, but not as good as the sweet soy/tomato sauce.

A less successful combination was my attempt to make tofu balls. I added some breadcrumbs to bind the balls, but I think I did not use enough. It ended up as tofu slider patties. Oh well, it's still good and went on another sandwich. More experiments are needed for the tofu balls.


Friday, March 22, 2013

My Basic Brownie Recipe


I love brownies. Over the years, I had probably spent a lot of money buying a brownie every week. About a year ago, I decided to try to make it myself, primarily so I can save some money. 
basic brownies

I used pre-packaged brownie mixes before, but most of what I found had partially hydrogenated oils in it (translate: TransFats). Mixes also contains a lot of preservatives, so there goes the idea of controlling ingredients. I was thinking to perhaps make it low-fat, wheat-free, or just purely decadent. To get in a healthier mode, I decided to find a recipe from scratch.

I found the Mmm-mmm Brownies recipe from Allrecipes.com. It was simple enough for someone like me, who was just getting back to baking, can follow. After the first try, I decided to change the proportions a bit, maybe substitute the ingredients for something else, and now, it looks like a totally different recipe.

The directions are still similar to the original in Allrecipes, but the revised ingredients and instructions (for your convenience) are below.

batter
Mixing them together.... with nibs, of course.

Mmm-mmm-much Better Brownies
Original recipe makes 1 9 x 9 inch pan.

Ingredients
  • 1/2 cup butter, melted
  • 2/3 cup brown sugar  
  • 1 teaspoon vanilla extract
  • 2 eggs
  • 1/2 cup all-purpose flour
  • 1/2 cup unsweetened cocoa powder
  • 1/4 teaspoon baking powder
  • 1/4 teaspoon salt
  • 1/2 cup chopped walnuts (optional)


Directions
  1. Preheat oven to 350 degrees F (175 degrees C). Grease a 9 x 9 inch baking pan.
  2. In a medium bowl, mix together the melted butter, sugar, and vanilla. Beat in eggs. Combine flour, cocoa, baking powder, and salt; gradually stir into the egg mixture until well blended. Stir in walnuts, if desired. Spread the batter evenly into the prepared pan.
  3. Bake for 20 to 25 minutes, or until the brownie begins to pull away from edges of pan. Let cool on a wire rack before cutting into squares.

Variations
  • Add 1/2 cup of chocolate chips instead of walnuts. Better yet, do it in add them to walnuts. I tried using peanut butter chips, but I think this ended up to be too heavy.
  • Add 1/3 cup of cocoa nibs for that extra crunch.
  • Use rice flour instead of all-purpose flour to reduce the gluten. This makes it friendlier for folks watching their phosphorus. Makes for a softer brownie.
  • Replace butter with mashed bananas, preferably overripe. If you prefer, add about 2 Tbsp of butter to keep it moist. Will keep for a couple of days.
  • Add coconut flakes on top for a tropical feel.
  • And lastly, my favorite! Use mini-muffin tin to bake the brownies. It bakes in about 10-12 minutes and makes the perfect two-bite serving. Great for potlucks! I haven't figured out how to remove the bump though.

Brownie bites with a dusting of confectioners sugar


Happy Baking!

Thursday, March 14, 2013

Cream Sauce Virgin

I still had some pumpkin gnocchi leftover and was getting tired of the brown butter sauce. So I consulted my favorite recipe book, Google, for some possibilities.

Hmmm.... Pumpkin Ravioli with Gorgonzola Sauce - sounded interesting. One problem: I did not have Gorgonzola, and I was not sure if I will like it. Also, I am watching my cholesterol and am not too thrilled about using heavy cream. Let's keep looking, but we'll refine the search to include "light." in it.

I found this recipe in Cooking Light magazine, but I still had a dilemma on not having Gorgonzola cheese and did not want to go to the store. I also did not have any milk, nor hazelnuts. Improv time: Substitute Parmesian for gorgonzola, almond milk for milk, and sliced almonds for hazelnuts.


I decided to cut the sauce recipe in half, since I do not have that much pasta left. The result was pretty good; I was so proud of myself. The almond milk reduced nicely, and thickened with the butter. Also, the addition of the cheese thickened it more, giving a wonderful creamy, cheesy consistency.

The one flaw was that it seemed a bit bland, even with the addition of pepper and a dash of salt. I decided to add some garlic powder - okay, about a half a tablespoon of garlic powder. I figured that powder would work better since I am adding it at the end.

End result was pretty good. My husband did say that he thought I put too much garlic in the sauce, but I thought it was perfect with the gnocchi and broccoli. The pasta and veggies seemed to have mellowed the garlic. In researching it, it looks like I created an alfredo-style sauce, but may be missing some ingredients.


It's still good, and I consider it a success.  Now, I am more daring to try similar sauces. Light versions, of course.

Saturday, March 9, 2013

Going Bananas? Make Banana "Ice Cream"

We had a delivery from Safeway last week that included eight free bananas - eight bananas! Too much for two people and cat. We thought that this was a great deal since in addition to the fruit, it also included free delivery. We also thought that we can finish all that bananas. After all, my husband had visions of peanut butter filled bananas as a snack.

Well, that did not happen, and we still had six bananas! Now, they're getting brown.

I remembered reading about banana ice cream from frozen bananas; that seems like a great option for the remaining six. So, I put the whole bananas in the freezer: peel and all.

Bananas in a blender
Bananas in a blender - Puree & Stir
Over the week, I finally got around to making Banana Ice Cream based on the recipe from Sparkpeople.com. This recipe is a combination of peanut butter and bananas so it follows my husband's vision.

One problem though: I did not peel the bananas first. DUH!

I searched Google again for possibilities and found a lot of options. What I tried is the technique shown in Happy Herbivore.com. I got my trusty knife and surprisingly, the bananas did peel easily. The fruits were extraordinarily cold though, so it helped to put on a latex glove.

I followed the recipe - but there was another problem: I do not have a food processor. I had to use my blender, which did not quite like pureeing frozen bananas without anything liquid. It needed a little bit of liquid, so I had to add a bit of almond milk (about 1/4 c). I figured the nuttiness of the almond milk would compliment the peanut butter. After adding the almond milk, the pureeing came easier. Still, a lot of stirring was involved.

Verdict

The result was actually pretty good. Pureed frozen bananas turned out to be surprisingly creamy. I wanted to try the recipe as-is first and see if we need to increase the peanut butter. My husband said we should.

I served this batch with some light whipped cream and peanut butter granola for crunch. The granola also tied to the hint of the peanut butter flavor of the ice cream. I think next time, we'll try 1 Tbsp instead. 

Serving it in a ramekin also added a touch of elegance to it. I could have gone overboard and added chocolate syrup, but I opted for simplicity for this one and focusing on the natural flavors of fruit and nut, with a hint of cream. It was yummy, almost like ice cream.

Perhaps next time, I will use the recipe at Herbivore.com that uses vanilla and cinnamon or maybe some combination of it. Vanilla and Peanut Butter does sound great together.

Just goes to show: When life gives you bananas, make banana faux-ice cream. Until next batch.

Tuesday, March 5, 2013

Popovers!

My husband cleaned our oven over the weekend, and I am dying to use it. Yesterday morning, I was in the mood for pop-overs and decided that it should be my first project with the clean oven.

I started out with the popover recipe in AllRecipes.com. I really did not want to use normal milk because I am watching my dairy intake, so I thought I would try a low calcium soy milk. I used Classic Soy Dream, which we always have in the refrigerator. Since I am starting to drink Almond Milk, I thought I would try baking it with Silk Almond Milk, but since that particular brand of soy milk had lower calcium, I thought I would try that for today. Maybe Almond milk next time.

I also do not have a popover pan (yet), so I had to use my muffin pan. I think this will work out nicely.
Finished pop-overs
Finished Product: Warm Popovers

I remembered seeing popovers made in the Food Network, most likely "Diners, Drive-Ins, and Dives" with Guy Fieri. I looked for the tips from that show. I wrote "Hot Pan, Warm Batter". I also wrote "definitely use a popover pan," but it is too late for that.

I also found that I did not have cooking spray, which I usually use when baking. As always, in my kitchen, we need to improvise again, and use melted butter. Should still do the trick, right?

Popovers with Marmalade and Peanut Butter
Yummy with Marmalade and PB!
As I prepared the batter, I warmed the oven and popped the pan in with solid butter cubes. I figured that the oven will melt it for me. After a few minutes, I removed the pan and spread the melted butter on the sides, and popped it back in the oven. This may be a mistake, since the butter did brown a bit once the batter was ready.

The popovers came out good. Unlike my first attempt where I used rice milk, these popped beautifully. It looked a bit too brown, but they tasted great and not burnt at all. I think for next time, I may either reduce the cooking time, cooking temp, or maybe both?

My husband also loved the result. Being a self-proclaimed peanut butter-aholic, he filled his with peanut butter, while I filled mine with orange marmalade. That was so good, we even had one that was PB&J. Later in the day, I tried a savory version with cream cheese - it was equally good.

'Looking forward to the next version.

Saturday, March 2, 2013

Welcome to My Virtual Kitchen

Hello and Welcome!

My husband has been encouraging me to start a food blog of our dining adventures and my cooking misadventures. I am still in the early stages of this project and experimenting.

In the meantime, you can follow my tweets in twitter.