Pages

Friday, November 22, 2013

Mad About Minis: Mini Pumpkin Pie


Mini Pumpkin Pie

I can’t let pumpkin season pass by without attempting to make a mini-pumpkin pie. I love pumpkin pie, but usually we just get a small pie (about 6 inches in diameter) and it lasts us about 2 days. Pumpkin pie will definitely be a great candidate for a mini.

Plus, since its National Pie Week this week, I thought it would be appropriate to blog about pie.

A mini pie, of course.

Of course, I never made a pie before. I just ate ‘em.  And a lot of them.

Wait, does pizza count?


My first challenge is the filling. I have never made pumpkin pie before, so I really am not sure what is in it. I researched recipes, including single serve ones. I found that lot of them are fairly similar in ingredients and proportion, so the recipes were relatively easy to combine. In my first attempt, I think I used too much filling for my 3 inch ramekin (oh, what a dilemma). I adjusted, and my second attempt had a better proportion.

The next challenge is the crust. There was no single-serve recipe for crust, so finding an adequate crust is the challenge. I first considered using an Oreo crust, but I don’t think that chocolate and pumpkin is a good combination. I also tried a vanilla wafer and butter crust, but that hardened in the baking process.

I finally settled on a cinnamon graham cracker crust. I did not add that much to it, just a little butter for moisture and a tiny tiny pinch of salt. I think this is the best option for this pie; it just turned out a bit crumbly. I was hoping that it would somewhat hold.

Here’s what I have. I think it’s great.  It's not too sweet (since I try not too put too much sugar, even agave nectar). I am also a bit conservative on the salt. This was just right for me.

It may still use some improvement, especially around the crust. I would love to hear what you think.


Mad Gourmet’s Mini Pumpkin Pie

Ingredients

Filling

  • 2 Tbsp of pumpkin puree
  • 1/2 tsp of flour
  • 1.5 Tbsp of milk  (4 ½ tsp)
  • 1 1/2 tsp (1/2 T) of sugar/maple syrup/agave
  • Generous pinch (about 1/16 tsp) of pumpkin spice
  • Generous pinch (about 1/16 tsp) of cinnamon
  • Tiny pinch of nutmeg
  • Tiny pinch of salt
  • whipped cream (optional, but why not?)

Crust

  • Cinnamon graham crackers, crumbled
  • 1 1/2 tsp of butter
  • Pinch of salt

Instructions 
  1. In your ramekin, combine all pie ingredients well.
  2. Microwave for 30 seconds on medium high. Stir.
  3. Bake at 325 degrees for 20-25 minutes until sides firm up.
  4. Put in mini pie in the refrigerator to firm up for at least an hour (Think of this as contemplation time).
  5. Serve with whipped cream.

Friday, November 15, 2013

Mad About Minis: Single-serve "Frosted" Vanilla Cupcake ... with sprinkles


Vanilla cupcake with sprinkles

I’ve been in a cupcake mode lately. We’ve been out and about in our Discovery Weekends and been encountering cupcake shops everywhere. Thank goodness for mini cupcakes; otherwise, I’d gain ten pounds.

In an effort to have a healthier cupcake and just limit myself to one, I looked for a single serving option. I found Shape Magazine’s online article on Delectable Deserts for One, and the vanilla cupcake seems to be a good start.

The advantage of this recipe is you probably have all the ingredients handy. The one thing that I usually do not keep is applesauce, but if I just made a batch of applesauce muffins, I am sure to have some left. I also used less butter and compensated with more applesauce. I may continue to reduce the ratio.

I am also used to baking single-serve muffins (see my low-fat chocolate banana muffin), so cupcakes should not be a huge transition. However, I did read once that the difference between a cupcake and a muffin: a muffin goes "Thud" when thrown at the floor. I take this as a challenge to get a cake like consistency to the cupcake.

Also, for these mini or single-serve recipes, use your toaster oven or the microwave. I am not that big on microwaved cakes, but if you don't have a toaster oven, use your nuker. It takes too much energy to heat up the big oven for this.


Single-serve "Frosted" Vanilla Cupcakes
Serves 1

Ingredients
  • 2 TBSP all-purpose flour
  • 1 TBSP + 2 tsp unsweetened applesauce 
  • 1 TBSP egg whites
  • 1 TBSP skim milk (I used unsweetened almond milk) 
  • 2 tsp sugar
  • 1 tsp unsalted butter, melted
  • 1/2 tsp vanilla extract
  • 1/8 tsp baking powder
  • 1 TBSP whipped cream or prepared frosting (optional)
  • 1 teaspoon sprinkles (optional)

Directions
  1. Preheat toaster oven to 350 degrees. Line a muffin pan with one liner.
  2. In a small mixing bowl, whisk together applesauce and sugar until combined. Stir in butter, vanilla, and milk.
  3. Add flour and baking powder and mix everything together well.
  4. Spoon batter into cupcake liner and bake for 27 to 30 minutes. Let cool completely.
  5. Frost and add sprinkles, if desired.
  
Verdict

Cupcake in Ramekin
Baked cupcake in ramekin...Nothing wrong eating it here.
Making this cupcake is so easy. It also spreads that yummy baking aroma all over the kitchen that drives my husband nuts. We ended up sharing the cupcake.

My husband loved this cupcake. It does have a very vanilla flavor. I am hoping that baking it in the toaster oven saved energy compared to turning on your big oven, but it did take a long time. Think of it is as contemplative time – to see if you really want to eat the entire cupcake.

Saturday, November 9, 2013

HELP WANTED: How to bind Butternut Squash-Tofu Patties?


ButterNut Squash Patties
I often have some leftovers from my Slow-cooked Butternut Squash recipe. Leftovers are great: it makes the meal the next day easier; often sometimes much easier. Plus, the cleanup is minimal if you just heat it as is. However, sometimes I do get tired of it and like to transform them for variety.

I have been working on making butternut squash-tofu patties. I figure that this would be great as a sandwich or a starter especially for Meatless Mondays. The sweetness of the squash with the protein from the tofu is a great combination for a sandwich, especially with 21-grain bread. Also, if you are fortunate enough to have some quinoa or kale, adding these would add texture and more protein. Kale would even add some color.

ButterNut Squash Patties Cooking
Promising beginnings, but...
I do think I need some help.  The patties are delicious, but I am having some problems binding them. My first three patties fell apart, but I was able to salvage two of them for the photo op.

I suspect that the pan may not be hot enough. I am also thinking for my next batch I may add some breadcrumbs, maybe 1/4 cup, to make it easier to bind.


Butternut Squash-Tofu Patties
Makes about 5 patties

Ingredients 
  • 1/4 block of tofu (I use extra-firm), mashed roughly with a fork
  • 2/3 cup leftover butternut squash (from Slow-cooked Butternut Squash recipe)
  • 1/3 cup of quinoa, cooked (optional)
  • 1/4 cup of egg whites (or 1 egg)
  • Salt, pepper, and garlic powder (to taste)

Directions
  1. Combine all ingredients.
  2. Heat a large skillet, grease the base lightly with oil.
  3. Fry the tofu-squash mixture in small patties (I use my 1/3 cup to measure)
  4. Make a few and keep warm on a hot plate until all the mixture is cooked.

 Let me know what you think. I’d love to hear your suggestions.

Friday, November 1, 2013

Slow-cooker Maple-Butter Butternut Squash


Served with corn and meatless meatballs
It is officially fall. And for me, that means winter squash: all sorts of them. I have not really worked much with the different types of winter squash in the past; I primarily stuck to what I knew, like spaghetti squash and something that vaguely resembled the squash that I enjoyed growing up in the Philippines (They say it's Pumpkin, but I don't think so). I AM excited this season to try out different varieties.

That said, one of my favorite squash dishes to prepare is a variation of “Maple-Butter Acorn Squash, Slow Cooked” from Kate Heyhoe’s Cooking Green book. I bought this book a year ago and have been trying to incorporate practices from this book in my cooking routine.  One of the techniques that she suggested was to use our crockpots or slow-cookers more, since these are more energy-efficient than using the oven or the cooktops. They “also consume less electricity than an incandescent light bulb”.

Butternut squash done
All done - ready to be served.
So, I brought the crockpot out…

This recipe also appealed to me since it sounds fairly simple. However, I am somewhat intimidated with slicing squash (of any type), so I decided to just get pre-packaged diced butternut squash. It is widely available and cheaper this time of the year.

Again, in the interest of not violating any copyright laws, I am not publishing the recipe. All I can say is that it contains maple syrup, some butter, salt, and not too much water. I really enjoy this recipe: I would combine it with some grains (barley or quinoa is my favorite) and some protein (vegetarian or not) to make it a complete meal. I love preparing this for Meatless Mondays (as seen in the first photo).

Maple Butternut squash with Kale
Or add some greens like kale
She also did suggest to experiment with flavors. I once combined it with yams and parsnip, but the maple flavor did not come through as much. I am thinking of changing up the spices, using chile, just garlic and butter, or even bacon next time.

I may even make the squash and green bean recipe that I enjoyed in my childhood…. but in a crockpot.

We’ll see.

Saturday, October 26, 2013

Discovery Weekends: Sweet Taste of the Tropics At Plumeria Flours


Plumeria Flours Box Lid
I finally had a chance to redeem a gift certificate from Plumeria Flours. It was a gift from a friend of mine (Thanks Sengita Warich!) and after a long hard work week, I felt it was about time to redeem it.

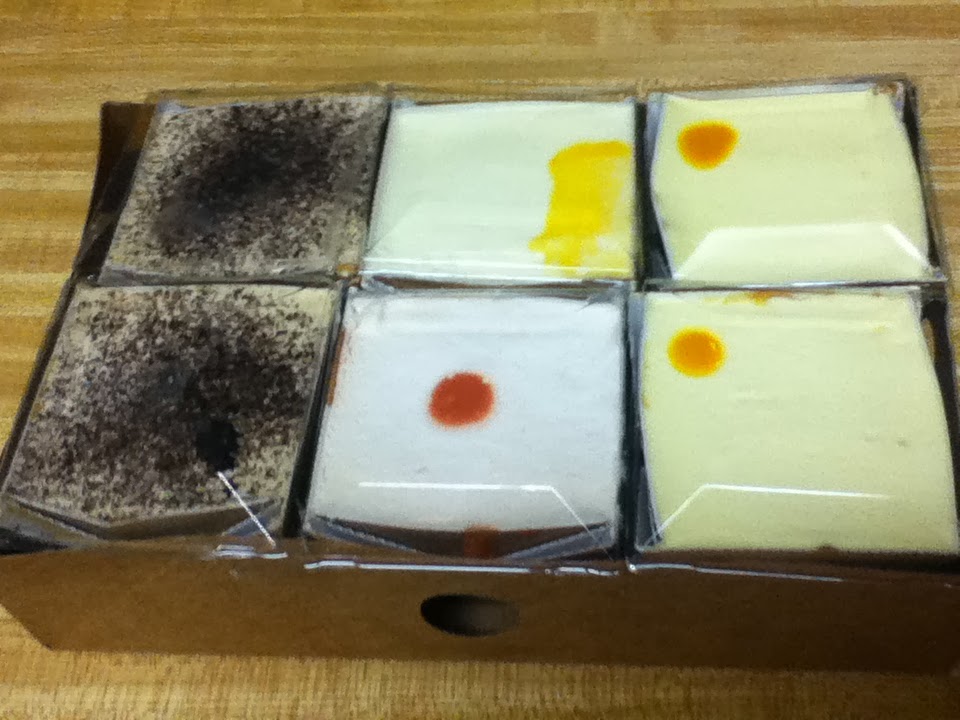
Plumeria Flours has a cozy shop tucked away in a strip mall near Walnut Creek’s Broadway Plaza.  One of their specialties is square tropical-flavored cupcake, which is what my gift certificate was good for – six of them! OMG, I do not think I can finish six cupcakes!

They had four flavors available that day: Mango, Papaya, Guava, and Kona Coffee. Since my favorite fruit is mango, I got two mango cupcakes. Also, two Kona Coffees, and one each of the papaya and guava. I think of the bunch, Kona Coffee is my favorite: good coffee flavor complemented by a mocha frosting. Yummy. My next favorite: you guessed it – mango. The cupcakes were topped with a thin layer of whipped cream frosting, appropriately flavored of course. This ratio was okay for me, since I usually do not like too much frosting. However, I felt it could use just a tad more. The frosting may not be enough for most people though, but there was more than enough cake, which I think is the most important part.

Square Cupcakes in a Box
I was disappointed that they did not have Haupia cupcake that day. Haupia is a traditional coconut-milk based dessert or snack. It has a similar consistency to gelatin, but richer. Haupia is one of my favorite snacks while I am in Hawaii and reminds me of being in Hawaii.

Another specialty item is their chocolate covered and plumeria decorated Oreos. I did not see any while I was there, perhaps because it was late on a Friday afternoon. If you check out Plumeria Flour’s website, you can see how gorgeous these cookies are (The website did say that it is Out-of-Stock).

Coffee Cupcake OpenedHowever, the caramel popcorn was very tempting and quite inexpensive too. I think $6 per bag. The popcorn had names like “Kalua Pig”, “100% Hapa”, “Humuhumunukuapua’a”. The names reflect the flavor: “Kalua Pig” was Bacon Caramel and “Humuhumunukunukuapua’a” (the Hawaiian state fish, a type of triggerfish) was Seaweed infused, if I remember. I don’t remember what “100% Hapa” was made out of… but I did remember discussing the contradiction in the name (“Hapa” is a pidgin Hawaiian word derived from the word “Half” … so, go figure, 100% = Half?).  Anyway, with six cupcakes, I decided it maybe prudent to save popcorn for a later trip.

For the fall, Plumeria Flours have limited hours: only Wednesday – Friday, 10 am – 5:30 pm. You can catch them at different Polynesian events in the San Francisco Bay Area. Check them out at PlumeriaFlours.com.

Friday, October 18, 2013

October Oatmeal and Oatbran Pumpkin Muffins

pumpkin muffins in a pan


I can’t let October to pass by without making something with pumpkin. I am still obsessed with oats and need muffins (even though, I baked that gigantic batch last week). One problem: I have not worked with canned pumpkin before.

I found a great recipe at AllRecipes.com. It had the perfect name: October Oatmeal Pumpkin Muffins. However, since I do have a huge batch of banana muffins, I decided to half the recipe.

Also since I am now also obsessing on oat bran, I decided to substitute some of the oats with oat bran. It just gives a hint of fiber! I also remembered the Chia Seeds this time for that touch of Omega-3.

I know this may look like a lot of ingredients, but I usually have most of these in my pantry. And I listed subs in case you don't have oat bran, whole wheat flour, etc. It will simplify the recipe. Also, especially this time of year, I usually have maple syrup handy - something I got accustomed to while vacationing in Pennsylvania.

October Oats and Oatbran Pumpkin Muffin 
Adapted from October Oatmeal Pumpkin Muffin from AllRecipes.com
Made about 10 muffins in a regular muffin tin

Ingredients: 
  • No-stick cooking spray
  • 1/4 cup + 2 TBSP whole-wheat flour
  • 1/4 cup rolled oats
  • 1/4 cup brown sugar
  • 2 TBSP all-purpose flour (or just use whole-wheat flour)
  • 2 TBSP of oat bran (or just add more oats)
  • 1/2 teaspoon pumpkin pie spice
  • 1/4 teaspoon baking powder
  • 1/4 teaspoon baking soda
  • 1/4 teaspoon ground cinnamon
  • 1/4 teaspoon ground nutmeg
  • Generous pinch of salt
  • 1/2 cup and 2 tablespoons pumpkin puree (I used Trader Joe’s Organic Pumpkin)
  • 1/4 cup almond milk
  • 1 egg, beaten
  • 2 TBSP maple syrup (or just use more brown sugar)
  • 1/4 cup (or more) of walnuts (optional)
  • 2 TBSP of butter, melted (optional – should just be 1 T (maybe its why its so moist)
  • 1 1/2 teaspoon of chia seeds (optional)

Directions

  1. Preheat oven to 375 degrees F (190 degrees C). Spray muffin cups with cooking spray.
  2. Soak oats in the almond milk.
  3. Whisk oat bran, all-purpose flour, whole wheat flour, sugar, salt, pumpkin pie spice, baking powder, baking soda, cinnamon, and nutmeg together in a large bowl until thoroughly combined.
  4. Stir oats mixture (from step 2), pumpkin puree, milk, egg, and maple syrup into the dry ingredients until batter is smooth;
  5. Fold in walnuts and chia seeds in the batter.
  6. Scoop batter into prepared muffin cups, filling them to the top.
  7. Bake in the preheated oven until a toothpick inserted into the center of a muffin comes out clean, 20 to 25 minutes; set aside to cool 5 to 10 minutes before serving.


Verdict

pumpkin muffin with banana muffin
Pumpkin muffin and friends
This is very good and very pumpkin-y. It’s very moist too, but maybe it’s because I put too much butter. I usually have peanut butter with my muffins, but these are so tasty that one does not really need it. I do know someone who would eat it with PB.

Next time, I think I’ll try it with white chocolate chips. That would be a great decadent twist... or a potluck treat for our Halloween party.

Saturday, October 12, 2013

Very Banana Nut Oat Muffins (with chocolate on the side)


I’ve been slammed at work lately and had barely enough time to cook during the week. Even when I am working from home, lunch is usually something easy and placed between bread (Think veggie burgers). I also have morning meetings that make making single-serve muffins or popovers impossible.

banana nut oat muffinsSince having cereal everyday does not appeal to me (not that there is anything wrong with that), I have been baking a batch of muffins every weekend. I’ve been in an oats mood lately. I love the texture, and besides oats are supposed to be heart-healthy.

I found the Healthy Banana Chocolate Chip Oat Muffins recipe in AllRecipes.com, and thought that this would beautifully meet my criteria. It was also the perfect time to clean up the pantry a bit, so I think this is the perfect opportunity to do so. As an example, I did not have enough chocolate chips on hand (oh, the horror!). I also do not have applesauce handy, but I did have lots of bananas! I also have some coconut flour leftover, so I thought using this up would be good to put a bit of coconut flavor.

Here’s the resulting recipe. Let me know what you think.

Very Banana Nut Oat Muffins
Makes 1 dozen muffins and 20 mini-muffins

Ingredients 
  • 1 cup rolled oats
  • 3/4 cup whole-wheat flour
  • 1/2 cup all-purpose flour
  • 1/4 cup coconut flour (can use whole-wheat flour instead)
  • 1/4 cup brown sugar
  • 2 teaspoons baking powder
  • 1/2 teaspoon baking soda
  • pinch of salt
  • 2 large eggs
  • 1/2 cup almond milk (I use Silk unsweetened)
  • 1 1/2 cup mashed banana (about three bananas, preferably over-ripe)
  • 1/8 cup agave nectar
  • 1/2 cup semi-sweet chocolate chips (optional)
  • 1/2 cup chopped walnuts or pecans (optional)

Directions

  1. Preheat oven to 400 degrees F (200 degrees C). Grease 12 muffin cups or line with paper liners.
  2. Stir rolled oats, the flours, sugar, baking powder, baking soda, and salt together in a bowl.
  3. Make a well in the center. Whisk eggs in a separate bowl until frothy; mix applesauce, almond milk, agave nectar, and banana into eggs.
  4. Pour moist ingredients into well made in dry ingredients; stir just to moisten. Batter will be lumpy.
  5. Fold in walnuts and chocolate chips, if using.
  6. Fill prepared muffin cups about 3/4 full.
  7. Bake in the preheated oven until a toothpick inserted into the center of several muffins comes out clean, 16 to 18 minutes. Cool in pan for 5 minutes before removing to finish cooling on wire racks. Mini-muffins bake for about 10-12 minutes. (I added about 1/4 cup of chocolate chips to the mini-muffins only)

Verdict

This is like the big batch version of my Low-fat Chocolate Banana Nut Muffin for one, except this one uses eggs and rises better than my single-serve version, probably because I baked it in the oven instead of the toaster oven.

This is a very filling muffin, perhaps from the combination of oats, whole wheat, and bananas. This goes great with Nutella, Chocolate Peanut Butter, or just plain peanut butter. My husband loved it – he’s the peanut butter maniac.

I will half recipe next time. I figure half of the recipe will make 9 to10 muffins, which will be perfect for the week. With the recipe halved, I can use mostly agave nectar (I did not have enough last time). I also forgot my usual mainstays: chia seeds for that Omega-3 boost! I would add one tablespoon next time (I did have chia seeds).

The coconut flour did not come through as much, but I am considering using some coconut oil next time. Adding both coconut flour and oil may elevate the coco-nutty flavor (I usually put about 2 tablespoons of butter for moisture, but I ran out). And I did miss the moisture.

Problem is coconut flour and oil is high in saturated fat, so use sparingly if you are watching your cholesterol. Coconut oil “is a good source of antioxidants and lauric acid, a heart-healthy fatty acid with anti-bacterial properties” (Source: “All Dressed Up” by Matthew Kadey, Yoga Journal, May 2013)

Definitely cleaned out the pantry and refrigerator, though.