Pages

Showing posts with label dessert. Show all posts

Sunday, November 8, 2020

Gluten-free Lemon-Elderflower Cake

Lemon cake in a pan with blue and yellow towel on the side
My current obsession is elderflower syrup. Because of the quarantine, I decided to buy a bottle and indulge. I just love the flowery scent and its distinct flavor. It’s one of my favorite add-ins to mocktails and yes, some boozy libations. 

I intended to only buy a small bottle, say 16 ounces, but I could not find one. My only choice was a one liter bottle via Amazon – so it will be elderflower for weeks!

As a result, I’ve been researching on what other ways I can use elderflower syrup. In my readings, I was rather surprised that I can make a cake with it. The cake recipe that inspired me was for 16 servings. While this was a good baking project, I decided that something smaller, and maybe healthier, would be more appropriate.


I searched a bit more. With some tweaks, here's what I have. Let me know what you think.


Ingredients

For the cake
  • 1 cup rice flour
  • 1/2 cup oats flour
  • 2/3 cup of granulated sugar
  • 2/3 cup low-fat Greek yogurt (I use 2%, will use 1 cup next time)
  • 2 large eggs
  • 1/2 cup butter
  • 1 1/2 tsp lemon zest
  • 1 1/2 tsp baking powder
  • 1 tsp vanilla extract
  • 1/4 tsp salt

For the syrup
  • 1/4 cup of elderflower syrup
  • 1 TBSP of lemon juice (about 1/2 lemon)

For the yogurt topping
  • 1/2 cup yogurt
  • 1 TBSP elderflower cordial or liqueur
  • 1 TBSP granulated sugar (if using liqueur)

Directions

For the Lemon Cake
  1. Preheat oven to 350F. Grease and flour 9" x 9" baking pan and line with parchment.
  2. In a medium bowl, whisk flours, baking powder, and salt until well combined. Set aside.
  3. Cream butter and lemon zest until smooth. Add sugar and beat on med-high until pale and fluffy (approx 3 mins).
  4. Reduce speed and add eggs one at a time fully incorporating after each addition. Add vanilla.
  5. Alternate adding flour mixture with milk & lemon juice, beginning and ending with flour. Fully incorporating after each addition.
  6. Spread batter evenly in the pan and smooth the tops.
  7. Bake for approx. 50 minutes or until a toothpick comes out clean.
  8. Place cakes on wire rack to cool for 10 minutes then turn out onto wire rack to cool completely

For the syrup
  1. While the cake cools slightly, combine elderflower cordial or liqueur and lemon juice.
  2. After 10 minutes of cooling, prick the still-warm cake all over with a skewer. Drizzle the elderflower and lemon syrup over the cake so that it seeps into the holes.


For the yogurt topping
  1. Combine Greek yogurt and elderflower syrup. Beat until incorporated.
  2. When cake is cool and lemon-elderflower mixture is all soaked in, slice the cake and top with a dollop of the elderflower yogurt.


Verdict

Slice of lemon cake with elderflower yogurt topping dripping on the side
This is a very delightful light dessert. I think it needs a bit more moisture so I may increase the yogurt next time. I also modified the recipe to make it gluten-free using rice flour and oat flour. I generally do not use the gluten-free flour blends because I don't like the resulting texture. I figured the eggs can provide sufficient binding.

With the Greek yogurt topping and paired with a light tea, this is a perfect breakfast or an afternoon snack. It brings a much needed taste of summer.


Tuesday, March 24, 2020

Italian "Water" Cake with Orange Juice


The entire state of California has been on shelter-in-place the last week. Residents are recommended to only get out of the house for essential needs: food, medicine. Most people have been home cooking and rationing, so we have been only going out for groceries once a week.

What that means is that we have to be very creative with our recipes. I’ve been rationing my stash of soy creamer because I don’t want to go to the store. If I don’t have an ingredient, I would substitute or omit.


Hence this water cake…

In all honesty, I made this cake before the shelter-in-place. I have been meaning to make a second version of this cake because folks liked my first version. It just ended up too doughy and heavier than I expected. Now, I have an opportunity to make it a second time and use up the items in my pantry.

For the second version, I decided to use a bit of almond flour for some texture (and protein). I just started using almond flour. I also cut down on sugar a bit.

Here's what I have... hope you enjoy.


Italian "Water" Cake with Orange Juice
Based on Italian Water Cake no eggs, no milk, no butter


Ingredients
  • 12 oz orange juice (about a small container)
  • 2 ½ cups Italian type 00 flour
  • 1/2 cup almond flour
  • 2/3 cup + 1 TBSP white sugar
  • 1/3 cup of canola oil
  • 2 tsp. baking powder
  • 1/2 tsp cardamom
  • Pinch of salt


Directions
  1. Preheat the oven to 350°F.
  2. Sift the flours, sugar, baking powder together into a large bowl. Sift, sift, sift – As my friend Jen said, one can never sift too much.
  3. In a separate bowl, combine the oil and orange juice and mix well. Slowly add the dry ingredients to the water and oil and mix it all.
  4. When the oven is hot, pour the mixture into a greased cake pan and bake for about 45 minutes. Note: Test the cake with a toothpick in the center before removing it from the oven.
  5. If you like, you can dust the cake with powdered sugar or top it with yogurt and jam.

Verdict

I love this recipe because it does not use a lot of ingredients, which is perfect for a shelter-in-place. However, you do need 00 flour to make this work. I just happened to have some. Don’t use regular flour because the results will not be as good (according to the comments in the original recipe).

It does taste very good. It's not light like an angel food cake, but it's delicious. I am now thinking of a coffee-flavored cake, but I'm thinking that it would technically require milk - so its a work in progress.

Also, check out the original recipe. Mine did not vary from it that much, but I think its unique enough to share. I also converted some of the measurements to friendlier terms.

Let me know what you think.

Saturday, January 21, 2017

Lighter Onolicious Butter Mochi

Butter Mochi
It has been a while... My day job has been getting the best of me last year. I have been working long hours as usual and all my energies have been focused on work. Don’t get me wrong – I have been cooking, but it was mostly for sustenance. I have been relying on the cooking experience that I had in the previous year to add some variation, but I have had no time to read up on trends, new techniques, or even watch cooking shows. Honestly, I miss it... a lot!


However, it's a new year. I had time to relax and somewhat catch up. What the New Year also means is making mochi for our dojo's new year celebration. We celebrate Kagami Baraki every year, and one of the traditional treats is mochi. I feel compelled to somewhat maintain tradition - perhaps in a non-traditional way.

I have a small batch mochi recipe that I've been using when I have the urge to make mochi. But that is usually good for only 2-3 people (or one very hungry cook). I do not think that would be good for a potluck though, plus I am not looking forward to rolling mochi balls for 20 people (Watch out for it on a future post, though).

I found a recipe for Butter Mochi a while ago and decided it was time to make it for this year's party. It's not quite Japanese mochi, but I think this reflects my personality especially at the dojo: Slightly Japanese, slightly Hawaiian - although I am neither (I'm Filipino). In reading the reviews, some people said that this recipe reminded them of Filipino bibingka. So, this is almost perfect...

The one that I found originally had adzuki beans and I could not find it. Luckily, this one from allrecipes was very similar. The bonus was it had a high ranking.

What I don't like about it was it seemed to be too rich - eggs, butter, condensed milk, coconut milk - oh so yummy, but so high calorie. Besides, with all the rich foods everyone has been enjoying through the holidays, I thought a lighter version would be more appropriate, but being cautious not to sacrifice flavors.

Since the holidays allowed me to rest my brain cells, I believe I have come up with very good, if not excellent, substitutions. If it were last year, I'd probably come up with zilch. 

This is what I have so far… as always, let me know what you think.


Lighter Ono Butter Mochi

Ingredients:

  • 1 lb mochiko (1 box)
  • 1 2/3 cup of sugar
  • 1 1/2 cup lite coconut milk (I can)
  • 1 1/2 cup 2% milk
  • 1 stick of butter (1/2 cup)
  • 1 tsp vanilla extract (or more)
  • 1 tsp baking powder
  • 1/8 tsp of salt

Directions:

  • Preheat the oven to 350 degrees F (175 degrees C). Grease a 9 x13 inch baking dish (or if you prefer thinner cakes, 2 8 x 8 inch baking dishes).
  • In a medium bowl, whisk together the eggs, vanilla and milk.
  • In a separate larger bowl, stir together the rice flour, sugar, and baking powder.
  • Pour the wet ingredients into the dry ingredients, and stir to blend. Mix in melted butter. Pour into the prepared pan(s).
  • Bake for 1 hour in the preheated oven. Cool completely, then cut into squares to serve.


Verdict:

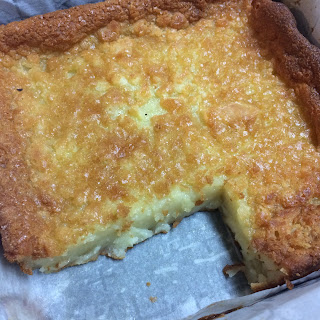
Butter Mochi in Pan
Butter Mochi: The crust is the best!
As the Hawaiians would say, Auwe! This was a hit at the party. The kids loved it, and asked me to make it again soon. The adults even asked me for the recipe. I was quite flattered. My self-proclaimed non-dessert eating husband even had seconds!

I brought some extras at the office, and one of my office mates said that it reminded them of an Indian snack called Pitha. According to her, pitha also has rice flour, coconut milk, sugar - but no eggs. Another office mate said it tasted like a Malay snack called kuay. No sure of the spellings though…

One change that I would make is to figure out how to half the recipe. This resulted in two 8 x 8 pans (I made them thinner) and while that is awesome, I think that may be too much. I have some ideas... But I need to experiment. I guess no one would complain if I make some more.


As a side note... It really feels good to write again. I really do hope I have more opportunity to do so in 2017. I have a list of projects to share specifically those inspired by our last trip to Kona in Hawaii last summer. Unfortunately, this year is going to be busy again... No complaints... it's job-security. I am wishing for more time to write.

Here’s to more creativity and more writing. Happy New Year!!!

Saturday, August 22, 2015

The Pie Crust Challenge: Making Galettes


One of the challenges that I have yet to overcome is to make pie crust. I’ve always thought that this was a difficult task and I had avoided it like the plague. Most of the single-serve recipes that I have made, I've used crushed graham crackers or better yet, crushed Oreos. Through these years I have successully eluded pie crust challenge. 

peach galette
However, a couple of weeks ago, we were blessed with a crop of sweet peaches in the farmers market, and I overbought. I did not want to waste this bounty so I thought it was time to make a galette. It would be appropriate to use up the peaches this way and also learn how to make something new and fun.

I’ve seen beautiful galettes in Instagram or in the Food Network magazine and always thought they were simple yet very elegant. It also looked super easy to do.

… if you are using a pre-made pie dough.

However, after looking at the pre-made dough, I decided to make my own. I could not control the ingredients in store-bought dough, and some of the pre-made dough even contains partially hydrogenated oil or lard or ingredients that I cannot pronounce. Besides, I still have most of the ingredients at home so it would be less expensive.

peach galette slice
In my search, most of the basic pie crust recipes seem to be very similar. I decided to use the one from Williams-Sonoma since you can never go wrong with that, right? However, I had a slight variation – I had whole wheat pastry flour, and I thought this would be an appropriate place to use it.

For the filling, I thought all I needed were the peaches. These guys were picked at the peak of the season and were sweet enough that they can stand on their own. However, sugar is recommended in most recipes, so I followed. Some recipes use cornstarch, flour, or vanilla. I decided to use the one from Chef Chloe, but adjusted the sugar since my peaches were super sweet, and I usually use less sugar in my recipes anyway. The recipe below has the original proportions, but I only used half. I also did not peel my peaches.

Here's what I had... let me know what you think.


Mad Gourmet’s First Peach Galette

Ingredients

For the crust:
  • 1/2 cup plus 2 Tbsp unbleached all-purpose flour
  • 1/2 cup plus 2 Tbsp unbleached whole wheat pastry flour
  • 1 Tbsp sugar
  • 1/4 tsp salt
  • 1 stick (8 Tbsp) cold unsalted butter, cut into 1/4-inch cubes
  • 3 Tbsp very cold water

For the filling:
  • 1/4 cup sugar (You can adjust for sweetness)
  • 2 Tbsp all-purpose flour
  • 1/4 tsp ground cinnamon
  • 1 tsp pure vanilla extract
  • 2 large peaches, pitted and sliced

Garnishes:
  • Confectioner’s sugar
  • Greek yogurt or whipped cream

Directions

Making the crust (by hand):
  1. In a large bowl, stir together the flour, sugar and salt.
  2. Using a pastry cutter or 2 knives or your very clean hands (use gloves, if you prefer), cut the butter into the flour mixture until the texture resembles coarse cornmeal, with butter pieces no larger than small peas.
  3. Add the water and mix with a fork just until the dough pulls together. Do not overwork (not really sure what this means, but I just kneaded it enough until it stuck together).

To make the filling:
  1. In medium bowl, whisk together sugar, flour, and cinnamon.
  2. Add vanilla and peaches, and toss mixture until peaches are coated.

To assemble and bake the galette
  1. Preheat oven to 375 degrees F.
  2. Line a baking sheet with parchment paper.
  3. Remove the dough from the refrigerator and fan peaches (ok, I just kinda randomly put it on the crust).
  4. Fold the 1-inch border of dough over the edges of the peaches.
  5. Transfer unbaked galette to the prepared baking sheet, brush with egg.
  6. Bake for 30 to 35 minutes until the peaches look shriveled and crust is lightly browned.
  7. Let the galette cool for at least 5 minutes before serving.
  8. Top with confectioner’s sugar or Greek yogurt.

Verdict

After making my first pie crust, I am more confident on doing these from scratch. I think the pastry flour added a yummy flakiness to the crust. A touch of confectioner's sugar and Greek yogurt really balanced out the flavors. I also like the fruit to crust ratio: it seems to be a better balance than a pie.

It was really good! We enjoyed it so much that we made another one. Actually, I found a sale on late season strawberries (Yes, I am a sucker for fruit). 

I’m looking forward to apple galettes in the winter and perhaps even savory ones too. Maybe I’ll even make a pie!

Since I love to experiment, I’d like to make a gluten-free version or a vegan one or a gluten-free vegan crust. I guess I have more research and Googling to do. I think Chef Chloe's vegan crust version is a good start.


Next big challenge: pizza dough