Pages

Showing posts with label snacks. Show all posts

Sunday, November 8, 2020

Gluten-free Lemon-Elderflower Cake

Lemon cake in a pan with blue and yellow towel on the side
My current obsession is elderflower syrup. Because of the quarantine, I decided to buy a bottle and indulge. I just love the flowery scent and its distinct flavor. It’s one of my favorite add-ins to mocktails and yes, some boozy libations. 

I intended to only buy a small bottle, say 16 ounces, but I could not find one. My only choice was a one liter bottle via Amazon – so it will be elderflower for weeks!

As a result, I’ve been researching on what other ways I can use elderflower syrup. In my readings, I was rather surprised that I can make a cake with it. The cake recipe that inspired me was for 16 servings. While this was a good baking project, I decided that something smaller, and maybe healthier, would be more appropriate.


I searched a bit more. With some tweaks, here's what I have. Let me know what you think.


Ingredients

For the cake
  • 1 cup rice flour
  • 1/2 cup oats flour
  • 2/3 cup of granulated sugar
  • 2/3 cup low-fat Greek yogurt (I use 2%, will use 1 cup next time)
  • 2 large eggs
  • 1/2 cup butter
  • 1 1/2 tsp lemon zest
  • 1 1/2 tsp baking powder
  • 1 tsp vanilla extract
  • 1/4 tsp salt

For the syrup
  • 1/4 cup of elderflower syrup
  • 1 TBSP of lemon juice (about 1/2 lemon)

For the yogurt topping
  • 1/2 cup yogurt
  • 1 TBSP elderflower cordial or liqueur
  • 1 TBSP granulated sugar (if using liqueur)

Directions

For the Lemon Cake
  1. Preheat oven to 350F. Grease and flour 9" x 9" baking pan and line with parchment.
  2. In a medium bowl, whisk flours, baking powder, and salt until well combined. Set aside.
  3. Cream butter and lemon zest until smooth. Add sugar and beat on med-high until pale and fluffy (approx 3 mins).
  4. Reduce speed and add eggs one at a time fully incorporating after each addition. Add vanilla.
  5. Alternate adding flour mixture with milk & lemon juice, beginning and ending with flour. Fully incorporating after each addition.
  6. Spread batter evenly in the pan and smooth the tops.
  7. Bake for approx. 50 minutes or until a toothpick comes out clean.
  8. Place cakes on wire rack to cool for 10 minutes then turn out onto wire rack to cool completely

For the syrup
  1. While the cake cools slightly, combine elderflower cordial or liqueur and lemon juice.
  2. After 10 minutes of cooling, prick the still-warm cake all over with a skewer. Drizzle the elderflower and lemon syrup over the cake so that it seeps into the holes.


For the yogurt topping
  1. Combine Greek yogurt and elderflower syrup. Beat until incorporated.
  2. When cake is cool and lemon-elderflower mixture is all soaked in, slice the cake and top with a dollop of the elderflower yogurt.


Verdict

Slice of lemon cake with elderflower yogurt topping dripping on the side
This is a very delightful light dessert. I think it needs a bit more moisture so I may increase the yogurt next time. I also modified the recipe to make it gluten-free using rice flour and oat flour. I generally do not use the gluten-free flour blends because I don't like the resulting texture. I figured the eggs can provide sufficient binding.

With the Greek yogurt topping and paired with a light tea, this is a perfect breakfast or an afternoon snack. It brings a much needed taste of summer.



Thursday, September 26, 2013

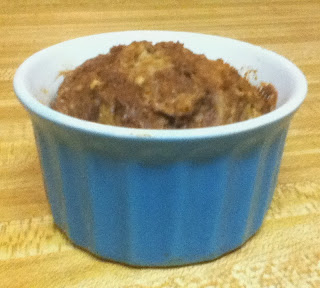
Mad about minis: Low Fat Chocolate Banana Nut Muffin for One


Banana Chocolate Muffin
Most of my single-serving or mini recipes have been really decadent stuff: lava cake, brownies, coffee cake. This one however, was inspired by a need. I wanted a muffin, but the car was in the shop and I did not want to walk to the nearest bakery (about a 20 minute walk, round-trip). I had time and ingredients on hand, so I thought I’d google and see if I can satisfy my craving.

I found the Blueberry muffin recipe from Chocolate-covered Katie and started with that. It was summer and I had blueberries handy for my cereal. It was perfect… I did later tweak it to add some texture and my current obsession with oats.

Below is what I have so far. Sometimes, I have experimented with different flours, so I’ve tried different combinations (almond, spelt, coconut). The combination below is my most basic one, since these are usually in my pantry. It also simplifies my recipe… for those mornings when I really need coffee.


Low Fat Chocolate Banana Nut Muffin for One
Makes one muffin

Ingredients 
  • 3 tsp of rolled oats
  • 4 tsp of whole-wheat flour
  • 2 tsp of all-purpose flour
  • 2 tsp of brown sugar
  • 1/4 tsp baking powder
  • Pinch of salt
  • 1/2 tsp vanilla extract 
  • 4 t of mashed banana (original recipe called for 1T oil - about 2 inches of banana)
  • 4 tsp milk of choice (Use less if using liquid sweetener.)
  • 2 tsp of walnuts (optional)
  • 2 tsp of chocolate chips (optional, but why not!!!)

Directions
  1. Preheat your oven to 330 degrees.
  2. Mix first six (dry) ingredients in a ramekin, then add wet.
  3. Mix until combined (don’t over mix - but make sure its mixed thoroughly). 
  4. Bake for 15 minutes or so. (20 minutes in my toaster oven). Baking time will vary, depending on the flour and oil/applesauce you use.) If this is too long, you can also put this in the microwave for about 90 seconds or so. Remember, microwave times vary.

Verdict

Peanut Butter Swirl Muffin
Variation: Peanut Butter Swirl Muffin
It has been a staple particularly if I haven’t baked a batch of muffins over the weekend (or am tired of that batch). I’ve substituted applesauce instead of bananas, and that works just fine.

I also use this as a minimal clean-up recipe: that is why I just mix and eat this off the ramekin. I’ve also got it down so I only use my 1 tsp and 1/4 tsp measuring spoon.

The problem with this is that this can be so good that you wish you baked a big batch of it… or at least two.

Saturday, September 21, 2013

Mad about Minis: Coffee Cake for One


coffee cake in a panThe trip to Wayfare Tavern inspired me to make coffee cake. I have not made an entire coffee cake before, and looking at the recipes on the internet, I think I am a bit hesitant to make something with that much butter and eggs. Don’t get me wrong… I love coffee cake. Once a week, I go on a quick coffee cake run for breakfast. I just know that if I bake a huge batch, I will probably gain 10 pounds in one week.

That said, I think I can commit to a mini-coffee cake. Besides, Wayfare Tavern served mini coffee cakes with our bill. It is just appropriate to make a small one.

I found a recipe for coffee cake in a mug from Chocolate-covered Katie. I think this will just do the job… to start. I did end up doubling the streusel because the first time I made it, it was not quite enough. I also did not put streusel in the middle of the batter, since there was not enough for the top in the first place.

I did use applesauce on my second attempt to cut down on fat on the streusel. I ended up using real sugar though, since I am not a big fan of sugar-alternatives (If you are diabetic or watching your carbs, feel free to substitute).

Here’s what I ended up with. I hope you enjoy and tell me what you think.


Coffee Cake for One

Ingredients:

For the cake:

  • 3 TBSP of Spelt Flour (You can use 1 1/2 Tbsp all-purpose flour and 1 1/2 Tbsp whole-wheat flour.)
  • 1 TBSP sugar (or 1 stevia packet or 1/2 tsp pure) 
  • 1/4 tsp baking powder
  • pinch of salt
  • 1 TBSP plus 2 tsp water
  • 2 tsp butter
  • 1/4 tsp pure vanilla extract
  • 1/4 tsp walnuts (optional)

For the streusel (optional):  
  • 1/4 tsp cinnamon
  • 2 tsp brown sugar
  • 1 tsp applesauce
  • tiny pinch salt
  • about 1 tsp of walnuts

Directions:

  1. If using an oven, preheat to 330 F.
  2. Combine batter dry ingredients and mix well.
  3. Add wet and mix until just mixed. In a separate bowl, combine all streusel ingredients.
  4. Fill a greased ramekin with the batter.
  5. Sprinkle on the streusel on top of the batter.
  6. Cook 20-25 minutes in the oven (Alternatively, you can microwave it for around one minute in the microwave. Remember microwave times vary.)
 
Verdict

coffee cake servingThis is a great start. It tastes just like store-bought coffee cake, but maybe slightly denser than store-bought coffee cake, but probably a bit healthier. I may need to experiment with using less sugar and perhaps using applesauce instead of butter.

I may also need a new toaster oven. Things just take way too long to bake in this one.

Maybe after I get a food processor.

Friday, August 2, 2013

Chocolate-Walnut Biscotti


Biscotti and Chai
The real breakfast of champions: biscotti and chai
My husband and I have been on a biscotti-phase lately. It has been my husband’s breakfast of choice, and I don’t mind its crunchy goodness either.

My mom used to make biscotti. It seemed like there was a new batch of biscotti every month (I think its her favorite to bring to a potluck). So I thought, how hard could it be? Of course, she also made sushi and I know those are difficult. In fact, when I took a sushi making class, my one takeaway was to tip my sushi chef more, but I digress…

Back to biscotti…

I googled possible recipes, but there were a lot of biscotti recipes out there. I really needed to narrow it down. Chocolate – can’t go wrong with chocolate.

Biscotti to go
Have Biscotti Will Travel.
For some reason, I was drawn to the Chocolate-Pistachio Biscotti recipe by Martha Stewart. Perhaps it is because I had luck with her quinoa pancakes before. Most likely its because I have most of the ingredients for this.

One problem though, this required creaming the butter and sugar. It’s not exactly my favorite thing to do, but maybe its one way of overcoming my creaming-phobia.

I followed this recipe almost exactly to what Martha did. However, I had to substitute walnuts for pistachios. I heard that pistachios are very high in potassium, and I am still trying to cut down. I also used brown sugar instead of white (because I love the flavor with chocolate) and cut it to 3/4 of a cup.


Here’s the recipe. Hope you enjoy.
 

Chocolate-Walnut Biscotti
 
Ingredients

  • 6 tablespoons unsalted butter, softened
  • 2 cups all-purpose flour
  • 1/2 cup unsweetened cocoa powder
  • 1 teaspoon baking soda
  • 1/4 teaspoon salt
  • 3/4 cup brown sugar
  • 2 large eggs
  • 1 cup chopped walnuts
  • 1/2 cup chocolate chips

Directions

  1. Heat oven to 350 degrees. Put parchment paper on a baking sheet; set aside.*
  2. In a medium bowl, whisk together flour, cocoa powder, baking soda, and salt. In the bowl of an electric mixer, cream butter and sugar until light and fluffy. Add eggs; beat until well combined, scraping down sides of bowl if necessary. Add flour mixture, and stir to form a stiff dough. Stir in walnuts and chocolate chips.
  3. Transfer dough to prepared baking sheet; form into a slightly flattened log, about 12 by 4 inches. Bake until slightly firm, about 25 minutes. Cool about 5 minutes. Reduce oven to 300 degrees.
  4. On a cutting board, using a sharp serrated knife, cut biscotti diagonally into 1-inch-thick slices. Arrange biscotti, cut sides down, on baking sheet, and bake until crisp but still slightly soft in the center, about 8 minutes.

Biscotti Batter
Biscotti Batter: Drier than what I am used to

Biscotti Log
Cutting the biscotti log was not as bad as I thought


Rebaking biscotti
Rebaking Biscotti... Yum

*Note: to conserve in energy and since it takes me a while to transfer the dough, I actually heat the oven as I stir the walnuts and chocolate - around the last part of Step 2).


Verdict

This was a good starter biscotti. It’s relatively easy and delicious.

That said, this recipe was way too much for two people, even if we’re in a biscotti phase. I had to bring some to my dance class and we enjoyed it as an after workout snack. Besides, who could not resist chocolate?


Saturday, June 1, 2013

Yummy Cheesy Veggie Quinoa Bites


I still had some cooked quinoa left and was not sure what to with it. I could add it with some brown rice as a side dish for this evening’s dinner, but I wanted to try something more exciting.

I ran into a couple of recipes that seem to be good candidates: both are quite similar to each other. One is Quinoa Pizza Bites and the other is a Mini Ham Cheese Quinoa Cups. Although I really wanted to make the pizza bites, I did not have all the herbs or mozzarella cheese. So, I decided to somewhat use components of both recipes. I did not have any ham either, so it had to be vegetarian.

This is also a good clean-the-refrigerator recipe; you don’t have to use the exact veggies in the recipe, just use what you have in your fridge that would be good for baking (much like Chopped).

This is a great protein-filled snack: quinoa, eggs, cheese, and veggies – you can’t beat that. Combined with a green salad, the veggie version is a great lunch for Meatless Mondays… or any day for that matter. 

You can double the recipe to make more. Also, for a meatier version, add 1/2 cup of diced ham to the mixture.


Cheesy Veggie Quinoa Bites
 Adapted from Fit for Success' Quinoa Pizza Bites & IowaGirlEats' Mini Ham and Cheese Quinoa Bites
Makes about 12 mini cups

Ingredients

·       1 cup cooked quinoa (about 1/3 cup uncooked)
·       2 eggs
·       1/2 cup red onions
·       1/2 cup peppers, shredded
·       1/2 cup broccoli, diced
·       1/2 cup shredded jack cheese
·       2 Tablespoons parmesan cheese
·       1/4 cup green onions
·       1 ½ tsp of Italian Seasoning
·       Salt & pepper, to taste


Directions

1.     Preheat oven to 350 degrees.
2.     Combine all ingredients in a large bowl and mix to combine.
3.     Liberally spray a mini muffin tin with non-stick spray and spoon mixture to the top of each cup.
4.     Bake for 15-20 minutes, or until the edges of the cups are golden brown. Let cool for at least 5 minutes before removing from the mini muffin tin.

Friday, May 24, 2013

Quinoa Applesauce Muffins


Since I work full-time, I often have breakfast on the go. My go-to breakfasts are usually bagel and cream cheese, with a tomato, a pastry, or some sort of muffin. Buying a muffin or pastry every day can be unhealthy, not to mention expensive. You never know what ingredients they use. This is especially important if you have dietary restrictions. As an example, for a while, I was watching my cholesterol, potassium, and phosphorus. A daily dose of store-bought muffins can create havoc in one’s diet.

So starting last year, I decided to experiment on making muffins. I’ve had a number of successes last year mostly experimenting on different flavors, reducing sugar and fat, and using rice flour. This year, I wanted to experiment with using different flours or grains. Since I still have quinoa, I thought this would be a great time to try quinoa muffins.

I made applesauce muffins before, but using regular flour or rice flour (a gluten-free option). I’ve made it so many times that I have made a low fat version. (which can be easily converted to non-fat if you really want to).

Note to self: Blog post on Basic Applesauce Muffins! That is also a good recipe.

I am not sure exactly what proportion to use with quinoa, but most recipes recommend about 2 parts flour to 1 part quinoa ratio. As I prepared the batter, I found that a 1:1 ratio is better (maybe because the quinoa is a bit mushy).


Mad Gourmet's Quinoa Applesauce Muffins


Ingredients
  • 2 tablespoon butter, melted
  • 1 cup white sugar
  • 1/4 cup agave nectar
  • 1 1/4 cup applesauce
  • 2 eggs
  • 1 cup quinoa, cooked
  • 1 cup all-purpose flour
  • 1 1/2 teaspoons baking soda
  • 1/2 teaspoon salt
  • 2 teaspoons ground cinnamon
  • 1/2 teaspoon ground nutmeg
  • 1/2 cup raisins
  • 1/2 cup chopped walnuts

Preparation
  •  Cook about 1/3 c of quinoa per package directions. I usually just cook a cup and leave the rest for later use (pancakes or side dish).
  •  Melt the butter on stovetop for mixing (You can do this while you are prepping your dry ingredients; If I am having burgers for lunch, I save the pan to cook the burger for that yummy buttery flavor).


Directions
  1. Preheat oven to 350 degrees F (175 degrees C). Grease muffin tin.
  2. Sift together the flour, quinoa, baking soda, salt, cinnamon and nutmeg. Set aside.
  3. Beat eggs. In a large bowl, combine melted butter, applesauce and eggs.
  4. Beat wet ingredients in the flour mixture, mixing just until incorporated.
  5. Stir in the raisins and walnuts. Spread batter into prepared pan.
  6. Scoop into muffin cups.
  7. Bake in preheated oven for 20-25 minutes, or until golden brown, Test to see if a toothpick comes out clean. Cool in the pans for 5 minutes before turning out onto cooling racks.

Verdict

I really enjoyed these muffins. The quinoa added a great texture and a protein boost.  I did expect a crunchier consistency, but maybe next time, I’ll toast the quinoa first.


I think for next time, I would use some baking powder to give it a bit of a rise.

Also, I wish I read this article from lunchboxbunch.com on how to cook fluffy quinoa before I got started.