Pages

Sunday, December 28, 2014

Spanakopita with Kale (Kale-o-kopita)


Spanakopita has always been one of my favorite Greek dishes. Unfortunately, since I have developed a sensitivity to spinach (of all things, right?), I can no longer have a traditional spanakopita. However, making spanakopita with alternate ingredients has been in my bucket list of cooking.
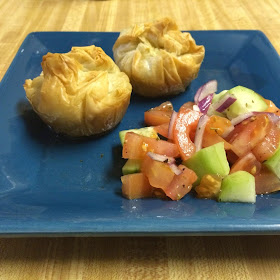
Kale parcels serving
Served with a quick Greek-style salad
Kale actually gave the ultimate substitute. It gives me the green look of spinach and great nutritional value. It is also good that I love kale and it has become one of our staples, particularly the curly kale. In fact, if I eat more kale! My hair may turn curly and green.

The docs also gave me specific orders to avoid feta cheese (ugh), something about it being a soft cheese. As a result, I have another challenge in my hands. I can have cream cheese, so that gives me a start, but it would not give me that distinct feta taste.

Since I have some of the basics, I have been sleeping with and meditating on the cookbook that we bought at our favorite Greek Festival in Oakland. I also have been researching recipes on the web. It is classic me: I went into my usual analysis-paralysis.

Then I procrastinated since I did not want to bake in the summer: 90 degree temperatures, you know. But now that it's winter, I don't mind a hot oven (in fact, I welcome it). It is time to pursue it.
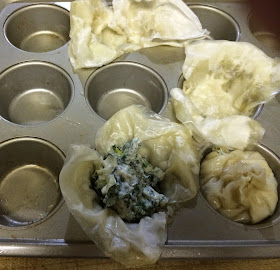

Making phyllo parcels
Preparing the parcels
I decided that Christmas week would be the perfect time to try this recipe out. I have a lot of time and I can get what I have been visualizing into reality. Besides, I should complete my goals before year-end.

And to make it more difficult for me, I decided to use the parcel technique that I learned from Giada and initially used in my baklava. I figured this will make my kale-o-kopita more portable.

This time I was well-prepared for working with phyllo. I have a small kitchen, so I cleared my counter space. I needed to hang the cook book from a hanger to create more room!

Here's what I have so far. Please note, this was only tested once... let me know what you think.


Mad Gourmet’s Cheesy Kale Phyllo Parchments (or Kale-o-kopita)
Based on several Spanakopita recipes from Kali Orexi!
A collection of recipes by the Philoptochos Society of the Ascension Cathedral
In Oakland, California

Ingredients
  • 1 bunch of kale, about 10 cups of kale
  • 1 leek (about a cup)
  • Salt and pepper to taste
  • 8 oz cream cheese (I used light)
  • 1/4 cup of Parmesan cheese
  • 2 tsp of Italian seasoning, divided
  • 15 sheets of phyllo
  • About a stick of butter, melted
  • 1/2 cup of olive oil


Directions: 
  1. Cut kale in fine pieces and squeeze the water out. Set aside.
  2. Cook leeks in olive oil until tender. Season with salt and pepper.
  3. Add kale, cream cheese and Parmesian cheese to the leeks (I microwaved the cream cheese for about 30 seconds to soften before adding to the mixture). Mix well. Set aside.
  4. Melt butter and let cool. Mix olive oil in the butter.
  5. On a dry work surface place 1 sheet of phyllo. Using a pastry brush and the remaining melted butter, lightly cover the entire sheet of phyllo with melted butter and olive oil.
  6. Cover the first sheet with a second sheet of phyllo and brush with melted butter mixture. Continue until there is a stack of 5 sheets of phyllo.
  7. Cut the stacked phyllo rectangle into 4 equal pieces (Cut lengthwise into 2 pieces and widthwise into 2 pieces. This will end up into a rectangular shape).
  8. Carefully press each cut piece of phyllo into greased muffin tin cups. Press 2 tablespoons of the kale mixture into each of the phyllo cups.
  9. Gather the ends of each of the phyllo squares and tuck to make a sachet shape.
  10. Continue shaping the remaining sachets in the other mini-muffin tin.
  11. Bake until the edges of the phyllo are golden, about 30 to 35 minutes.


Verdict

Kale Parcels crosssection
Yummy! Looks just like spanakopita!
One bite brought my husband and I back to Greece, strolling through Plaka or exploring the alleys and streets in Mykonos or just relaxing in Santorini. It was great.

Although, I thought it can use a bit more tweaking, my husband thought it is perfect as it is. I think it can use more Italian seasoning to make the cream cheese taste more like feta, maybe another half teaspoon or a full one. I could try to use fresh herbs too, but that would require more.

My other dilemma when I was planning this was what to do with the extra phyllo. I remember the last time I used phyllo, when I made bastilla, I ended up with a bunch of extras. This time by accident, I bought a packet that has two separate phyllo rolls (YES!) which means I will can have another phyllo adventure mid-January.

Phyllo cups
Bonus! Phyllo cups!
I still ended up with had some extra phyllo, about six sheets. So, I made myself some phyllo cups! It’s cheaper than buying a packet. Then, I can use it to get a pre-taste of my creation or for some cheesy sundried tomato scrambled egg cups the next morning.

In my curiousity, I asked Google translate what kale is in Greek. Google says that Kale in Greek is λάχανο or lachano. So, does this make this Lachanokopita?

Kali orexi!

Sunday, December 14, 2014

Mad About Mini’s: Mad Gourmet’s Single-serve Peanut Butter Pie


Peanut Butter PieMy husband is mad about peanut butter. It seems that he puts everything in peanut butter. The most indulging one lately was putting peanut butter on a chocolate chip cookie. Really? Like, aren’t you watching your sugar intake?

He found this recipe in the newspaper and enthusiastically said that I should make it (since I am the baker). However, I know he (actually we) should not indulge too much on dessert so I decided to make a single-serve version.

As always, proportions are always challenging in making it single-serve, particularly if the recipe looks like a combination of volume (cups) and weight (ounces). I just decided to treat the 8 ounces of cream cheese to be approximately one cup.

For the peanut butter, I used regular store-bought peanut butter the first time and needed to add sugar. However, since I started buying freshly ground honey-roasted peanut butter from Whole Foods and loved it. I did not even need to add sugar. Otherwise, it is turns out too sweet.

Challenge really was the chocolate cookie crumb pie crust. The recipe called for a ready-made chocolate cookie pie-crust. Aargh, no proportions! I just winged it and used two Oreo cookies. In my first attempts, I tried pre –baking it, putting a bit of butter, but the best one was just crushing it and placing it firmly at the bottom.


Mad Gourmet’s Mini Peanut Butter Pie
Based on Peanut Butter Pie from the Contra Costa Times
Note: I did not find the original source in my clipping. Apologies for not referencing the original baker.

Ingredients

Crust

  • Two Oreo Cookies, crumbled


Filling

  • 4 tsp of cream cheese (I used light cream cheese)
  • 2 tsp of white sugar
  • 5 tsp of peanut butter
  • 2 tsp of almond milk
  • 2 tsp of whipped cream
  • Couple of drops of vanilla extract (optional)


Directions

  1. Crumble the cookies and firmly press the crumb mixture into the ramekin. Set aside.
  2. Put cream cheese, sugar (if using), peanut butter, and almond milk in a small bowl.
  3. Microwave for 30 seconds. Mix well.
  4. Fold in whipped cream and vanilla extract.
  5. Pour on top of crust.
  6. Cool until firm (about an hour) before serving.


Peanut Butter Pie PreparationVerdict

My husband loves this dessert, almost as much as the Mini Key Lime Pie. This is the one dessert that I made “off-theme” this Thanksgiving, because I know he likes it so much.

I have also used mini Oreos for the crust. The advantage of doing that is one can top the pie with a cookie for a better presentation.

I guess you can serve it without the chocolate crust, but the combination of chocolate and peanut butter is just irresistible. You got to do it.

I guess it is much like eating peanut butter with chocolate chip cookies.

Monday, December 1, 2014

Mad About Minis: Single-serve Haupia Coconut Pudding


Haupia in Ramekin
I had a bit of a writer's block for Thanksgiving. I was not too sure what to feature for thanksgiving since we normally do not do a traditional Thanksgiving feast. My mom is usually out of town this time of the year (time for a long drive) and my husband's family is 2000 miles away.

That does not stop us from celebrating. I consider Thanksgiving a cook's holiday because it's an opportunity to plan a themed dinner and prepare it. These days we’re only doing it for the two of us, but who knows when it will change.

This year, we decided on a Hawaiian style menu: sweet and sour spareribs, ahi and veggie poke, and of course, kalua-style turkey and cabbage (Note: I am still working on some of these recipes starting with the poke, so expect them in my blog next year). We considered buying some laulau, but decided we have too much food as it is.

For dessert, I made Haupia for two. Haupia is a coconut milk pudding traditionally made with arrowroot starch. I really have to make this single or double serve because it is soooo good and I may not be able to resist the whole batch! I once bought two orders of it at a local eatery for a potluck and the cashier thought it was all for me. She said she could finish two or three orders.

Since coconut milk is the "thing" these days, you may enjoy this recipe, especially if this is your first encounter with Haupia. I based this on a recipe I learned from a Hawaiian cooking class. Hope you enjoy it.


Mad Gourmet’s Single-serve Haupia (Coconut milk pudding)
Based on a recipe by Ron Serrao

Haupia Thickening
Thickening...
Ingredients
  • 1/4 c of canned coconut milk
  • 2 tsp of cornstarch
  • 1.5 tsp of sugar
  • pinch of salt


Directions
  1. In a small bowl or ramekin, microwave coconut milk for 20 seconds to warm it up.
  2. Mix rest of the ingredients and dissolve.
  3. Heat in microwave in 20 second intervals until mixture coats the back of a spoon. (Usually about a minute or three 20 second attempts - see photo below)
  4. Cool and enjoy.


Verdict


Haupia Love
It took me a while to figure out what to write, but I think this was worth sharing. I have been meaning to explore the snack cakes from Hawaii and the Philippines and this is a good start. It's easy to make.

I think the portion size for this recipe is perfect – Just enough to have a sweet finish to a tasty Hawaiian feast.

This recipe scales easily too. If you need it for two or three, just scale it appropriately.  Please do note, the original recipe was for 12 and used 1/4 tsp of salt.

I usually make this when I have leftover coconut milk (usually from making curry). I have not tried it using coconut milk from the carton yet. If you try it let me know how it turns out. It's fairly quick to make too, so it's great for a quick dessert.

The other thing is you can have fun with it since Haupia can be easily molded or cut. See what I did with a cookie cutter. Love it!

Aloha! A hui hoi.